|
User Guide
COBrA supports the browsing and editing of two ontologies, and allows
the user to manually create links between terms in two ontologies. For
example, links between tissues in an anatomy and the cell types of the
tissues can be recorded and stored: these links are referred to as mappings.
Mappings can make reference to a third resource - the reference ontology.
COBrA also allows ontologies to be translated, read, and written into
Semantic Web languages including OWL.
COBrA supports reading and writing files in the following formats:
- OBO flat file format (1.0 STRICT)
- Gene Ontology (GO) flat file format, i.e. that using % <
~
- DAGEdit flat file format, i.e. that using @is_a@ @part_of@
is supported for reading ontologies
- GO XML/RDF as defined: http://www.geneontology.org
- OWL as defined: http://www.xspan.org/obo.owl
can be used, and COBrA now handles OWL predicates that hold of RDF
Resources in a flexible way. Description logic expressions are not
supported.
- Ontologies can be exported to OWL for further editing in Protege, see below for details.
Troubleshooting:
- OBOEdit users should ensure that files are saved in Output type: OBO_1_0 STRICT, use the
advanced options in the save dialog.
- The Gene Ontology files should be downloaded in OBO or GO
flat file formats. COBrA is compatible with the GO XML/RDF
format, but not with the OBO XML or OWL formats currently under
developement.
- COBrA is not designed for ontologies that use DL
quantifiers, only simple relationships between Classes and between
Classes and Literals should be used.
- COBrA uses the OBO namespace for the OWL namespace URIRef,
so saving to OWL requires that this be set
correctly, e.g.
http://www.xspan.org/#
COBrA also supports the manipulation and analysis of ontologies, for
example:
- merging
- inference
- validation
these functions are based on the Jena RDF libraries.
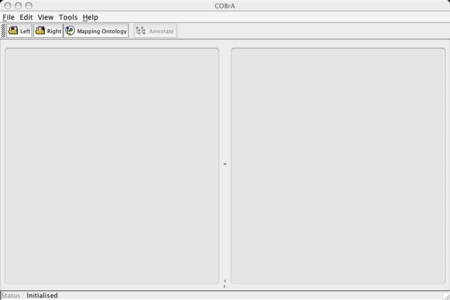
Loading an Ontology
On starting COBrA, the interface should look as indicated below
(right). Ontologies are loaded via the 'File' menu or by clicking on
the buttons
labelled 'Left', 'Right', 'Mapping Ontology'. After loading, the
class hierarchy appears in the left panel, and the term
details appear in the right panel, assuming the ontology was
loaded into the Left side. Ontologies loaded into the Right appear with
the class hierarchy in the right panel.
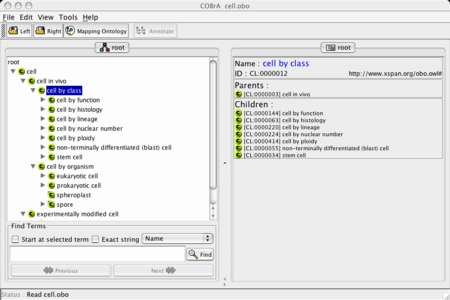
Browsing: The Tree View and the Node View
On loading an ontology into the left panel, the ontology is viewed as a
tree on the left and the details of the selected node are displayed on
the right. Once a second ontology is loaded into the right panel, the
node or tree view can be chosen using the tabs on the top of each
panel.
Both tree and node views can be used for navigation - click on the
parent or child node of interest. The tree and node views are kept in
synchrony, even if one of the views is hidden. The four pre-defined
ontology relationship are represented by the following
icons:
Relationship
|
Icon
|
is_a / subClassOf
|

|
partOf
|

|
subEventOf
|

|
develops from / lineage
|

|
Editing
Editing can be performed either by drag-and-drop - by clicking on
nodes in the tree and dragging
them using the mouse - or by calling the Term Editor. Dragging a
node to a new position causes the new parent to be added to the term
definition. The full range of editing options can be selected from a
menu
which pops-up on right-clicking
a
term in the tree
view
(or
Apple-Key and click on a Mac). The menu offers:
- Create Term:
create
a new term as a child of the selected term.
- Edit Term: edit
the
selected term using the Term Editor.
- Delete Term:
delete
the selected term and all references to it.
- Delete Sub-Tree:
delete the selected term and all child terms which are solely dependent
on that term. All references to deleted terms are removed.
- Mark Term as Obsolete:
the term is marked obsolete. Note that only the OBO format records
information about term status.
- Copy: Copy the
term.
- Paste: Paste a
copied term to a new location.
Single terms can be copied from one ontology to another by using the Copy function, as described above,
e.g. in the left ontology, and selecting Paste from Left to Right
on the Edit menu on the top
menu bar. The copied term will appear in
the right ontology at the currently highlighted position.
A new ontology can be created by selecting the Create New
Ontology option from the File
menu. Before doing so, the User
Profile should be edited such that the ID prefix does not clash
with
that of other ontologies that have been created. The prefix+the
automatically generated number are assumed to be unique identifiers of
a concept. If the same ID occurs in several ontologies it is assumed to
refer to the same thing.
Mapping
Once two ontologies are loaded, mapping can begin. First a file must be
loaded to store the mappings as it is desirable to be able to record
the
mappings without changing either original ontology. Once this is done,
the terms to be mapped are highlighted by clicking, and then the Annotate button
is clicked to call the mapping editor. A justification for the mapping
ought to be recorded in the dialog. The author should also be recorded
and this slot
can be filled automatically by filling-out the user profile - select the User Profile
option from the File
menu. Terms with newly-created mappings are shown in blue. When an
existing mapping file is imported use the option View/Show all mapped terms? to
show all prior mappings. (Switch off this function to begin editing the
ontology.)
The settings under File / Mapping
Configration allow
categories to be used for mappings, for example, load the
mapping-template.owl file (in ./DemoFiles) as the Mapping Ontology to
see the 5 anatomy mapping types used on the XSPAN project. The option Edit Mapping Categories
can be used to view and edit the catgeories. Once these settings are
aligned, the Annotate dialog
will allow you to select a category for
each mapping. If the categories are changed from the default, you also
need to edit the Mapping Ontology file to contain the categories you
wish to use (the term names musts correspond, and they should occur
below root). Open the mapping ontology template file in the Left panel
to make any
edits required.
A more advanced mapping can be performed by loading a Reference
Ontology. In this case, each mapping must be accompanied by the
selection of one or more terms from the reference ontology. For
example,
the tissues in the celegans
anatomy can be mapped to those in the drosophila
anatomy by making these the left and right ontologies, and loading the
OBO Cell Type ontology as the reference. Each
tissue-tissue mapping is made on the basis of shared cell types.
A number of mapping procedures that
make use of the files in ./DemoFiles are described at the bottom of the
page.
The COBrA Menu Options
File
The options under File allow:
- Left/Right/Mapping Ontology
- Create New Ontology:
create a new Ontology;
- Open Ontology:
load an ontology from a file;
- Save: save the
ontology in the current format (OBO,OWL etc);
- Save As: save,
allowing the format and file name to be changed;
- Mapping Configuration:
see above;
- User Profile: see
above.
Edit
The options under Edit allow:
- Paste Selection from Right
to Left/Left to Right: terms that have been copied in the Right
ontology can
be pasted into the Left ontology, and
vice-versa;
- Edit Relationship Types: new
relationships can be added and deleted, the core relationship types
cannot be deleted;
- Search
and replace
Namespace Left/Right: the namespace used in the OWL ontology can
be changed by search and replace. The namespace must form a valid
URIRef.
View
The options under
View allow:
- Show
All Mapped Terms? all
ontology terms which have a mapping are displayed in blue;
- Mapping search:
clicking on a mapped term will cause the corresponding term in the
other ontology to be searched for and highlighted.
- De-select Show All
Mapped Terms? to switch off the
Mapping search function (e.g. to edit the ontology).
- Left/Right Ontology
Search/Set Root for Search: set an anchor term for the search
function. The root term name is shown in the
bottom left of the panel displaying the ontology graph;
- Left/Right Ontology
Search/Clear Root for Search: clear the setting;
- the set
search root feature can be combined with the Mapping search function to initiate
the automatic search for matching terms from the specified node in the
ontology. This is useful when the ontology is a complex graph, such as
anatomy ontologies that connect terms by part-of and link to start and
end stages (denoting the developmental timing of the anatomy). In such
an ontology, the first path found by search from the root of the
ontology may not be the one desired.
- Show Obsolete Terms?
OBO ontologies contain obsolete terms that are hidden by default, but
can be shown.
- Relationship Types
Left/Right: the view of the ontology can be altered to exclude
certain relationships, thus it is possible to focus on the is-a
structure alone, or to view part-of and lineage only.
Tools
The Tools
menu offers a number of functions which make use of the methods
provided
by the Jena 2.0 toolkit. Use of these functions requires some
understanding of Jena and RDF see jena.sourceforge.net
for more details. The options are:
- Merge Mapping Ontology
into
Left /Right- convert Mapping ontology and Left/Right ontology
into RDF graphs, and
merge the graphs. The result appears in the left/right tab pane. Note
that
errors may occur if the root nodes have the same ID (PREFIX.number).
Note that merging does not perform any sophisticated ontology checks,
rather, it computes the union of two RDF graphs.
- Apply Inference Rules to
Left - an window appears in which the rules to be applied
should
be entered, then the RDF graph of the left ontology is extended by
applying the rules. This is done using the Generic Rule Reasoner of the
Jena reasoner. The result appears in the right tab pane. A forwards
rule
defining partOf to be
transitive
would be:
[rule1:(?a
http://www.xspan.org/obo.owl#partOf ?b)
(?b http://www.xspan.org/obo.owl#partOf ?c)
->(?a http://www.xspan.org/obo.owl#partOf ?c)]
the effect
of this rule is to propagate the partOf
links. Forwards reasoning is easily visualised in this way, while
backwards
reasoning can also be performed using Jena and would be more useful in
a
query answering mode.
- Compare OWL Models:
both left and right ontologies are converted into OWL/RDF graphs and
the
isomorphism/intersection/difference is calculated, then the triples in
which the models differ are listed. A new window appears to show the
results. The listing can be found in the file "./analysis.html".
- Analyse Mappings: after
loading a Left, Right and Mapping Ontology, an analysis of the
consistency of the mappings can be performed. The analysis checks terms
and mappings such that, if term1 is a parent of term2 in the Left
ontology, term3 is the parent of term4 in the Right ontology and the
Mapping ontology links term1 to term4 and term2 to term 3 - the
mappings conflict (i.e. a child is mapped to a parent). All mappings
are analysed for structural consistency. This analysis is appropriate
for anatomy to anatomy mappings, but not for anatomy to cell type
mappings as in the latter case it may be meaningful for a sub-part of
the anatomy to have a mapping (cell type) that is more general than
that of the parent part. This analysis can be time consuming for large
ontologies. An example is given below.
- Import/Export Mapping
Ontology to/from tab-delimited file: the Mapping Ontology can be
stored as a sequence of pairs of IDs, rather than an OWL file. The
simpler format might be generated by a database, or other program.
However, all meta-data such as creator and date is lost.
- Include imported XSPAN ontology
when saving to OWL? The OWL file generated by COBrA uses the OWL
include-ontology statement to point to http://www.xspan.org/obo.owl,
rather than including the contents of this file in every ontology. This
causes problems when COBrA-generated files are loaded into Protege -
the solution for Protege 3.0 - 3.1.1 is to include the imported file
when saving to OWL format in COBrA. That is, this menu item should be
selected (checked) and the file saved in OWL format. Otherwise, this
option should not be selected.
Help
Show Help: shows this
file, or the XSPAN website if COBrA cannot find the help file.
Formats and IDs
The User Profile allows the prefix for any new ID to be set. The new ID
will then be the next in the series, e.g. if the prefix is MAP, and the
current highest MAP ID is 0000002, and a zero padding of 7 is desired,
then the next ID is: MAP:0000003. This procedure applied to newly
created terms in the left or right ontology as well as mapping terms.
IDs are not editable by the user. The default namespace for new terms
can also be set in a similar fashion.
Format
|
Read
|
Write
|
File Extension
|
OBO (1.0 strict)
|
Yes
|
Yes
|
.obo
|
| GO Flat File Format |
yes
|
yes
|
.go
|
GO XML/RDF
|
yes
|
as RDF
|
.xml/.rdf
|
DAG Edit
|
yes |
no |
|
OWL
|
yes
|
yes
|
.owl
|
COBrA
reads and writes OBO 1.0 (strict) format and has been extensively
tested with OBOEdit 1.000 beta 5. Some OBO attributes cannot be
edited
in COBrA (e.g. subset) but are stored and written out when the ontology
is saved in OBO format.
The GO XML/RDF format follows the definition in the GO DTD which uses is_a and part_of
but does not define their
meaning. GO XML/RDF ontologies are saved in RDF triple format.
Ontologies that contain other relationships will be written as RDF, but
the meaning of the relationships is undefined.
The OWL format is defined at http://www.xspan.org/obo.owl
and differs from the RDFS format by the use of partOf and the use of the classes EventClass or ObjectClass for the type of terms.
As
with RDFS, the definitions of the remaining GO relations are altered
but
their names are unaltered.
Both the RDFS and OWL formats are created by 'coercing' the original
ontology
relations and types to conform to the ontology definition. This is
required as few ontologies are expressed in RDFS/OWL and therefore
existing ontologies need to be converted from a flat file or GO RDF
format. Conversion is achieved by reading from one format and saving-as another. All
RDF-based formats use the creator
and date relations from the
Dublin Core for recording author and date information.
The DAG Edit format is supported for reading only, and is as expressive
as the GO Flat File format, if a flat file format is desired. However,
textual information may be lost such as term definitions, author, date
etc by writing to a flat file format. The following DAG Edit relations
are recognised (based on a survey of current OBO ontologies):
@isa_a@ | @ISA@ ==> %
@part_of@ | @PARTOF@ ==> <
@develops_from@ | @DEVELOPSFROM@ ==> ~
Mappings between ontologies are encoded by introducing a concept for
the mapping, e.g. a mapping between adult midgut
and intestinal
epithelium might be called IntestinalEpithelium-MidgutHomology
and encoded as triples:
<adult midgut hasMapping IntestinalEpithelium-MidgutHomology>
<intestinal
epithelium hasMapping IntestinalEpithelium-MidgutHomology>
<absorbative_cell isReferenceForMapping IntestinalEpithelium-MidgutHomology>
in RDF
proper:
<rdf:Description
rdf:about="http://www.geneontology.org/go#FBbt.00003138">
<j.0:hasMapping
rdf:resource="http://www.geneontology.org/go#CL.0000007"/>
<j.0:name>adult
midgut</j.0:name>
</rdf:Description>
or in flat
file format:
%
IntestinalEpithelium-MidgutHomology ; CL:0000007
^ adult midgut ;
FBbt:00003138
^ intestinal
epithelium ; WBdag:0005792
# absorbative_cell
; CL:0000212
in this
example, absorbative_cell
is the reference of the mapping (i.e. the common cell type).
Procedures
The various features may be used in combination, some examples are:
Mapping
- load an ontology into the left tab, e.g. the mouse anatomy
- load an ontology into the right tab, e.g. the cell ontology
- edit the User Profile adding your name and setting the ID
prefix
- create a new mapping ontology, use the option under the
File menu
- click on nodes that are to be linked, click Annotate on the
top bar
- repeat 5
- save the mapping file, use Save Mapping Ontology As, save
in OWL, OBO or RDF format only
Importing a simple
ID-ID mapping file, e.g. ./DemoFiles/human-mouse-100.txt
- load the abstract-human anatomy in the left panel (quite
slow)
- load the abstract-mouse anatomy in the right panel (slower)
- under Tools select Import Mapping Ontology from
tab-delimited file to load the file ./DemoFiles/human-mouse-100.txt
(takes some time also).The Mapping ontology will appear. Note: the file
must contain: left-ontology-ID \tab right-ontology-ID \newline pairs
- under View, select Show All Mapped Terms - the mapped terms
should appear in blue
- e.g. under 'Object' / 'AnatomicalEntity' / 'human' expand the part-of structure.
- Some terms should be blue.
- Select 'human' - set the 'Left Ontology Search/Set root
for search' option.
- In the right panel, select 'Object' /
'AnatomicalEntity' / 'mouse'
and set the 'Right Ontology Search/Set root for search' option.
- Expand the nodes under 'human'
until a term displayed in blue is found, click on it.The search for a
mapped term starts at 'mouse'
and the search finds the desired path to the mapped term (there are
many paths to this term).
- Under Tools,
select Analyse Mappings: The
structural analysis will be performed - taking upwards of 10 minutes.
- when prompted to save the results, provide a file name
with a .html extension (results.html).
<>view the results.html file in a web browser. An analysis of
each ID-ID mapping is presented, stating whether the mapping has
positive evidence in its support, has no evidence, or is contradictory
with other mappings. A summary of the proportion of compatible/no
evidence/contradictory mappings is given at the bottom of the page,
e.g.:
Number
of matches: 1223
Compatible: 1105 Total Score: 4006 Average: 3.625 (90.35%)
No
evidence: 118 (9.648%)
Incompatible: 0 (0.0%)
(for information: this set of mappings was generated automatically
using lexical and path-based analysis by Sarah Luger on the XSPAN
project)
Merging a Mapping File
- load an ontology for which mappings have been made into the
left tab
- load the mappings ontology
- use the Merge Mapping Ontology into Left operation under
Tools
- save the left ontology using save-as and save in OWL, OBO
or RDF format
Propagating Mappings
- load a merged mappings file (i.e. the result of Merging)
- use the Apply Inference Rules option under the Tools menu,
and a rule set such as
[rule1:(?a http://www.xspan.org/obo.owl#hasMapping ?b) (?a
http://www.xspan.org/obo.owl#part_of ?c) -> (?c
http://www.xspan.org/obo.owl#hasMapping ?b)]
in order to propagate mappings. Note that the rules
are applied to the OWL translation of the ontology, hence the use of
the
GO namespace.
Bugs and Problems
- loading GO termdb RDF/XML files in
the original XML syntax (e.g. after running qname over the file)
requires an internet connection to be available, else loading
will not complete. This is because the Jena parser tries to access the
GO DTD. Once such a file has been loaded, it can be saved in RDF, and
thereafter read/written without internet access as the saved format is
RDF triples. In general, loading and saving do not require a network
connection.
|