Basic Linux Usage
This section covers basic Linux commands and how to efficiently combine them to perform more powerful operations. Examples are shown in a format like this:
$ pwd /home/hwloidl |
 | If in the above example you got an error like
|
To get started, log in to one of the Linux Lab machines, using your account and password. You'll see a familiar graphical desktop environment. At the time of writing (Sep 2012) this is Gnome 2.28, running on CentOS 6.3 using a Linux 2.6 kernel. Go to the main menu (bottom left) and in the list of sub-menus, go to System Tools and in there to Terminal. Alternatively, right-click on the background and choose Open Terminal. You'll now see a terminal window, and you can execute the commands in this section within this window.
 | Linux QuickStart on MACS Linux Lab machines |
|---|---|
For step-by-step guidance for logging in and starting a terminal window, see this the Section called Step-by-step Login Information. |
| More detail on basic Linux commands |
|---|---|
The link list in the Section called Other Linux tutorials has many links to more detailed discussions. In particular, check out this discussion of basic Linux commands on the Linux Introduction pages of guru99. |
At this point you should have a terminal window running, showing the shell prompt that awaits input from the keyboard.
| Linux Quick Reference |
|---|---|
This tutorial covers only the most commonly used commands, to get started. Follow these links for an alphabetical list of Linux commands (O'Reilly) or this Linux quick reference card (O'Reilly). |
Preliminaries and Getting Help
First some preliminaries. The commands described here represent Linux/GNU system, i.e. the Linux kernel for interacting with the hardware, and several sets of basic user-level commands provided by the GNU project. Each of the commands typically implements an -? or --help option, which describes how to invoke it, e.g. ls --help. Each user-level command should have a manual page that can be viewed by the man command, e.g. man ls. In most cases these commands are binary executables or scripts that reside somewhere on the file system. To find the exact location use the which, e.g. which ls. You can use the file command to determine the type of the file. The pwd command prints the current directory. The whoami command prints your username (used for log-in). The hostname command prints the name of the machine you are working on. The uptime command prints for how long the machine has been running, since the last reboot. Some commands aren't executables but aliases to other command. Use alias to print them all. Some examples:
$ ls --help Usage: ls [OPTION]... [FILE]... List information about the FILEs (the current directory by default). ... $ man ls ... shows the man page ... $ pinfo ls ... shows the more detailed info page (use q to exit) ... $ which ls /bin/ls $ file /bin/ls /bin/ls: ELF 64-bit LSB executable, x86-64, version 1 (SYSV), dynamically linked (uses shared libs), for GNU/Linux 2.6.33, BuildID[sha1]=0x88bca03aed9a306510a0bbcde1ea165e1d54c1ce, stripped |
| Both the man and pinfo command will open a text base document viewer in your terminal to read the man/info pages. Press the q key to exit. |
| Online man pages |
|---|---|
Several web pages provide browsable, online versions of Linux man pages, e.g. Linux man pages . However, you need to check that the version of the command matches the one documented on these pages. Most commands provide a --version option for this purpose. |
You are now ready to execute simple commands. Don't be scared. Follow the examples in the next section to view the contents of your home directory and to navigate in the file system.
First Steps: Files, Directories and Navigation
| Linux quick-reference: |
|---|---|
I recommend you open this Linux quick-reference in a separate window, to have an explanation for the most common commands at hand. |
In most operating systems, documents are organised in a tree structure with directories as nodes in the tree and files as leaves in the tree. This means that each directory contains an arbitrary number of files and (sub-)directories. After login and launching a terminal, you'll be in your home directory. The command pwd will print the current directory. Use the ls command to list all files in the directory, add the options -la (l for long and a for all) to give more information for all files. Each line shows whether this is a directory (d) and the permissions in the first column, username and groupname of the owner in columns 3 and 4. Note that option -a shows all files, including hidden files that start with a dot. Without this option hidden files won't be shown. An important hidden file is .bashrc, which contains shell code that is executed whenever you open a new shell.
$ ls Documents/ Downloads/ public_html/ tmp/ $ ls -la total 20 drwxr-xr-x 1 newuser newuser 300 Aug 14 20:34 ./ drwxr-xr-x 1 root root 80 Aug 14 20:33 ../ -rw-r--r-- 1 newuser newuser 24 May 9 2011 .bash_logout -rw-r--r-- 1 newuser newuser 191 May 9 2011 .bash_profile -rw-r--r-- 1 newuser newuser 124 May 9 2011 .bashrc drwxrwxr-x 1 newuser newuser 60 Aug 14 20:34 Documents/ drwxrwxr-x 1 newuser newuser 60 Aug 14 20:34 Downloads/ -rw-r--r-- 1 newuser newuser 16 Jun 1 19:52 .draksnapshot drwxr-xr-x 1 newuser newuser 60 Jun 1 19:47 .gnome2/ drwxr-xr-x 1 newuser newuser 80 Jun 1 19:52 .MgaOnline/ drwxr-xr-x 1 newuser newuser 60 Jun 1 19:47 .mozilla/ drwxrwxr-x 1 newuser newuser 60 Aug 14 20:34 public_html/ drwx------ 1 newuser newuser 60 Jan 11 2011 tmp/ -rw------- 1 newuser newuser 72 Aug 14 20:34 .xauthMvdoYh $ls -ltr total 0 drwx------ 1 newuser newuser 60 Jan 11 2011 tmp/ drwxrwxr-x 1 newuser newuser 60 Aug 14 20:34 public_html/ drwxrwxr-x 1 newuser newuser 60 Aug 14 20:34 Downloads/ drwxrwxr-x 1 newuser newuser 60 Aug 14 20:34 Documents/ |
| The exact contents that you see in your home directory, as well as the name of the home directory will differ from the output above. You should see the same structure, though. |
To navigate between directories use the cd (change directory). To copy files use cp and to move files use mv. Either specify files and directories, giving the full path, or use . to refer to the current directory and .. to the parent directory. For example, the following enters the public_html directory, makes a copy of the index.html in it, and then goes back to the parent directory.
$ cd public_html $ cp index.html index-org.html $ ls index.html index-org.html $ cd .. |
| If the cp above returns an error message like this:
|
| Side remark: Filename completion |
|---|---|
To save typing, in particular if you need to refer to long filenames or deep pathes, use filename completion: start typing the filename, e.g. ind, and then hit TAB, which will complete the filename if it is unique, or show all possible matches. You can also use it to show all commands starting with the typed letters, e.g. ma TAB, will print all commands starting with ma. |
For frequently changing between directories, it is often useful to keep a stack of recently visited directories while navigating through the filesystem. To do that use pushd, which behaves like cd but remembers the directory you go to. Later, popd can be used to go back to that directory, or more precisely it jumps to the directory that's top of the stack of remebered directories. To show all directories on that stack, type dirs. For example, the following jumps to your Desktop directory, containing all files that you see on your graphical desktop, then lists all files (most recent last), prints the directory stack and then jumps back to the directory you started from. Note that ~ stands for your home directory, and you can use it jump directly to your home directory doing cd ~.
$ pushd Desktop/ ~/Desktop ~ $ ls -ltr total 3 -rwxr-xr-x 1 live live 1444 Jun 1 19:52 register.desktop* -rwxr-xr-x 1 live live 1234 Jun 1 19:52 draklive-install.desktop* $ dirs ~/Desktop ~ $ popd |
| Linux Practical |
|---|---|
If this is confusing to you, work through this practical before you continue with the Linux Introduction: Linux Practical. |
At this point you should be able to run basic commands from the command line. To exercise this knowledge, go to your home directory and show all files. Which of these files are directories?
| More on file access: |
|---|---|
A detailed discussion of the most important commands for accessing files and directories is given in the early sections of Chapter four in Sobell's textbook. Most online tutorials on Linux cover these commands in quite some detail as well (e.g. UNIX Tutorial for Beginners). |
Our Running Example: Build your Own Web Page
As a simple example, let's create your own home page. By convention, all your files visible within a web browser are stored in the directory public_html in your home directory. Such a directory should exist already. Check that by typing
$ ls public_html |
$ mkdir public_html |
| Alternative sample files for your home page |
|---|---|
The example below uses a web page with a style-sheet file and images for a pretty design. Alternatively, you can go through the same example using a minimal, single-file web page by starting off with cp /home/msc/public/LinuxIntro/www/samples/index-minimal.html index.html and then continuing with chmod commands below. |
The following steps will bring you into this directory (using the command cd), copy a set of sample files for your home page (using the command cp), and rename them so that they are used as your home page. To make the file visible to the world, you need to set its access permissions appropriately using the chmod command: in this case it gives all users (a) read (r) access to this file. See the Section called Security for more details on how to set permissions. Finally, launch a web browser, such as firefox, and point it to the local file.
$ cd ~ $ cd public_html $ mv index.html index-bak.html $ cp /home/msc/public/LinuxIntro/www/samples/redandgreen/index.html . $ cp /home/msc/public/LinuxIntro/www/samples/redandgreen/style.css . $ cp -r /home/msc/public/LinuxIntro/www/samples/redandgreen/images . $ chmod a+r index.html $ chmod go-w index.html $ firefox file:///`pwd`/index.html |
| Note the . ('dot') at the end of all cp commands above! If you see an error message like this
|
You can type the URL into the address field of a running browser, or point the web browser to your home page when you launch it, typing
$ firefox http://www2.macs.hw.ac.uk/~`whoami` |
Congratulations, you now have a home page, visible to everyone on the web!
At this point you should have a web browser running and see a red-and-green web page, showing the sample page you just copied over into your public_html directory.
| All editing of your web pages can be done directly in this directory. |
Editing Files
Now, you will want to fill in some contents. To do so, you will need to edit the file index.html. The editor of choice on most Linux system is emacs, so you can start editing by typing (use the option -nw to start the editor in the terminal rather than in an own window):
$ emacs index.html |
| Editing Files: Emacs cheat sheet |
|---|---|
You can find an emacs cheat sheet, summarising its most important commands, here. |
Now, in the editor modify the index.html file and change title and top-level heading to indicate that this is your web page: search for the text This is my home page and modify it. Add a 1 paragraph description about yourself, replacing the text Some text. You need only very basic knowledge about HTML to do this. Essentially, you just have to fill in the blanks of the sample page.
| HTML cheat sheet |
|---|---|
If you want to do more complex changes, look up this HTML cheat sheet. |
Now, go back to your web browser, the firefox window, and reload the page. You'll see that the text has changed, corresponding to your edits.
A note on editors: There are many more editors available on standard Linux systems: gedit (a graphical editor that is part of the Gnome infrastructure), vim (a very flexible text editor), pico (a small and simple text editor), nano (a pico clone and GNU software). You can call each editor from the command-line, and some can be used in batch mode for repeated processing of text files. Also, check the Accessoires section in the top-level menu of your window-manager (typically, bottom left menu) to get list of available editors.
 | In most cases, a text editor is all you need to edit text files using ASCII encoding. In some cases, such as Coursework 1 of F21CN, you need to edit individual bytes in a non-ASCII files. There are specialised editors, hex-editors, to do this. You can start the shed hex-editor directly from the command line:
|
At this point, you should have your own web page, created from the red-and-green sample page. If your user name is xyz12, you can view this page by typing the following URL in your web browser:
http://www2.macs.hw.ac.uk/~xyz12 |
Stream Editing
For repeated edits within a file, or on a batch of files, stream-editors are a powerful tool. The main stream editor on most Linux systems is sed. It is particularly useful for systematic replaces. Being programmable, it can be used for far more powerful tasks. See the Sed section of the Advanced Bash Scripting Guide for details.
 | Pipes | |
|---|---|---|
Before using a stream-line editor, some general remarks about one of the most powerful concepts in Linux systems: Pipes. Pipes allow you to redirect the output of one command to the input of another command. This way you can compose several commands on the command line to perform a more complex task. As an example, we want to count the number of files in our home directory. First, use cd ~ to go to your home directory. Now, you can list all your files in your directory, line-by-line, using the command ls -l. Another Linux command, wc, counts the number of bytes, words and lines in a text file. With option -l it only counts the number of lines. Composing both commands using the | symbol gives the number of files in the directory plus 1 (because the first line gives the total). In summary, do:
|
Returning to our home page example, we now want to add a sub-title as a slogan to our web page. Examining the index.html file, you will see that the "Website Title" text is a level-1 heading (<h1>). In the next line, there is a comment mentioning the slogan text. We want to replace this comment-line with a level-2 heading, containing our slogan. However, there are already level-2 headings (<h2>) in the HTML code, and we need to turn each of them into a level-3 heading. Rather than doing this manually in an editor, we use a stream-line editor to do this in one go. To do this, use sed to replace every instance of an H2-element to an H3-element. The notation to do such a substitution in sed is: s/h2>/h3>/g. It performs a substitution of the first string by the second string, with / being delimiters, and the g suffix indicating a global, rather than a one-off, substitution. In summary, do:
$ cat index.html | sed 's/h2>/h3>/g' > index_new.html $ less index_new.html $ diff index.html index_new.html $ cp -b index_new.html index.html |
Note that the > notation redirects the output of the sed command to a file, here index_new.html. You can check that the substitution worked as expected, by displaying the resulting file with the less command (q to exit). Alternatively, you can of course view the file in an editor. Another useful tool is diff, which displays the differences in two text-files. In this case, you'll see that all lines with an <h2> have been replaced by an <h3>. As with all commands, use the man page (e.g. man diff) for details on the command and its output. Once you are satisfied that the substitution worked as expected, copy the new file to the old one, using the cp. In this case we don't want to overwrite the old file. Therefore, we specify the option -b to back-up any exisiting file, rather than overwriting it (the back-up will have suffix ^).
Now, start an editor (e.g. type emacs from the command line or select gedit from the System -> Office -> gedit menu) and load index.html so that you can modify it. Search for the line that contains
Your website slogan goes here |
<h2> This is my slogan </h2> |
Now, go back to your web browser, the firefox window, and reload the page, to see how your web page has changed. This concludes the basic steps of this tutorial. You can continue to edit your web page, or proceed with the next sections, that cover other useful Linux commands.
Advanced topics: Other Uses of Pipes
Stream editing is one of the more advanced usages of basic Linux commands. Other useful commands for manipulating files are:
gawk (a column-based stream editor),
head and tail for extracting the start or the end of the file.
$ ls -ltr | tail -10 |
$ alias l='ls --format=long --no-group --sort=time --reverse --color | tail -"${LL:-10}"'
|
Regular expressions
In this section, assume that you have the source code for a project, that uses CVS as version control system. To do the examples in this section, first extract all files in the tar-file below, containing all sources. The command tar deals with (un-)packing files and directories, similar to zip on Windows systems. The options xfz specify to extract a compressed file, given as argument.
$ tar xfz /home/msc/public/LinuxIntro/ghc-6.12-eden-gum-CO.tar.gz $ cd ghc-6.12-eden-gum/rts/ |
$ ls *.[ch] |
Regular expressions are a powerful concept to enumerate an entire class of words or filenames. The basic constructs are:
. The dot matches any single character (e.g. ab. matches aba, abb, abc, etc).
[ ] A bracket expression matches a single character contained within the bracket (e.g. [abc] matches a, b or c).
[a-z] specifies a range which matches any lowercase letter from a to z (e.g. [abcx-z] matches a, b, c, x, y and z).
[^ ] negation of [ ], Matches a single character not contained in bracket. (e.g. [^abc] matches any character other than a, b or c).
^ matches the starting position of a string.
$ matches the ending position of a string.
* matches the previous element zero or more times (e.g. abc*d matches abd, abcd, abccd, etc).
Several tools use regular expressions to specify filenames or text. For example the egrep uses regular expression to define text to search for in a file. For example, if you want to search for all instances of slogan or Slogan in your index.html file, you can type in the following command:
$ egrep [Ss]logan index.html |
 | Regular expression notations |
|---|---|
There are different flavours of regular expression notation. The above notation is used for filename matching in the shell. Other notations are more powerful, for example Perl regular expression, or more easily readable, for example POSIX regular expressions. See these slides for a summary. |
We now use regular expressions, to list only a subset of all files (remember: lines starting with an # symbol are comments and you only have to cut-and-paste the commands after an $ symbol):
# Regular Expressions

# go to a checkout of ghc/rts
# explain different versions/aliases for ls

# list all C source or header files
$ ls *.[ch]
# search for Flags in these files
$ egrep Flags *.[ch]
# colourise
$ egrep -n --color Flags *.[ch]
# everything that accesses Flags, ie. a '.' afterwards
$ egrep -n --color "(Par|Gc)Flags[.]" *.[ch]
# several dots
$ egrep -n --color "(Par|Gc)Flags[.]{3,}" *.[ch]
# Flags but not with an 'n' after the '.'
$ egrep -n --color "(Par|Gc)Flags[.][^n]" *.[ch]
|
Another powerful command for finding files is find. It requires as first argument the directory where to start the search. Then, a sequence of options is given, that determines what to search for. In our example, we specify the filenames we are interested in, using the same regular expression as above. Other criteria in the search can be modification time (as in the -mtime example below), permissions, file type etc. See the man and info pages for find for more detail. The -print option specifies to print each successful match. The -exec option specifies a command that is executed for each successful match. The magic string \{\} is replaced by each matched filename in turn, and the string \; is needed to terminate the command. In our example, we want to search for the words ParFlags. and GcFlags. in all C source or header files, using egrep, which also uses regular expressions. In summary, do:
# recursively in all dirs
$ find . -name "*.[ch]" -print
# do something recursively in all dirs
$ find . -name "*.[ch]" -print -exec egrep -n --color "(Par|Gc)Flags[.][^n]" \{\} \;
# files modified within the last 24 hrs
$ find . -mtime -1 -print
|
| The multi-purpose find command |
|---|---|
Find is far more powerful than just a tool for searching files: it does a traversal of an entire directory structure. Its worth studying the man page for find to get an idea what you can achieve with this command. |
Your should now be in the top-level directory that was generated by extracting the tar-file (ending in .tgz) above. These files represent a checked-out version of sources that are maintained in a CVS repository (CVS is a specific version control system). There is one problem with the extracted files though: They all assume that the root of the repository starts with /u1/msc/. However, the setup in the department has changed recently, so now the repository we are referring to starts with /home/msc/. What we need to do is to change every file called Root in all sub-folders. In total there are 742 such files: you defintely do not want to make all these changes manually!
Therefore, and that's why I am discussing this in more detail, we want to use a few commands from the command-line to do these changes quickly. You could write a shell script to achieve this, but this will take longer, and writing e.g. a C# program will take even longer. So, doing this on the command-line involves 2 steps:
First we need to get a list of all files that need to be changed, based on the discussion above. The first command below uses find to get such a list and stores the result in variable called files. The second line below performs the modification we discussed above for each of the files (hence the for for loop), by using sed to perform a simple, textual substitution (indicated by the s in the following string. The result is written to a temporary file called R00t and this file is then moved to Root to replace the original file. In summary, 2 lines of commands achieved a modification of 742 files that is needed to continue with the exercises below
$ files=`find . -name Root -print` $ for i in $files ; do cat $i | sed -e 's,/u1/,/home/,' > R00t; mv R00t $i ; done |
Now, as a more involved example, we want to generate a list of version numbers for all files in all subdirectories. You can achieve this with the following sequence of commands:
# Getting a list of all working revision numbers # extract the revision number, using sed $ cvs status . | sed 's/Working revision[^0-9]*\([.0-9]*\).*$/\1/' # ignore all other lines $ cvs status . | sed '/Working revision/!d;s/Working revision[^0-9]*\([.0-9]*\).*$/\1/' # sort the numbers $ cvs status . | sed '/Working revision/!d;s/Working revision[^0-9]*\([.0-9]*\).*$/\1/' | sort # delete duplicate lines $ cvs status . | sed '/Working revision/!d;s/Working revision[^0-9]*\([.0-9]*\).*$/\1/' | sort | uniq # ignore stdout $ cvs status . 2>/dev/null | sed '/Working revision/!d;s/Working revision[^0-9]*\([.0-9].*\).*$/\1/' | sort | uniq |
| If you see this error message when running the first cvs command:
|
Another example below shows, how to find large files in a subdirectory, using pipes and
a little bit of shell programming, using shell variables such as $z.
An introduction to shell programming is given in the Section called Basic Shell Scripting Using bash.
The du -s *.[ch] command lists all C source and header files in all subdirectory, together with the file size.
The sort command, sorts the output by the first column, numerically (-n).
You can get a list of all files, sorted by size, with largest file last, using this command:
$ du -s *.[ch] | sort -k 1 -n |
while loop
iterates over all lines, binding the filesize to variable x and the filename to variable nam,
and calculating the total files size of all matched files in the loop body.
This total size is printed at the end. The brackets group the final 2 commands together.
In summary, do:
# disk usage $ du -s *.[ch] | sort -k 1 -n | (while read x nam ; do z=$[ $z + $x ] ; done; echo "Total size of all C files in kB: $z") |
| More on regular expressions: |
|---|---|
Check out this section in the Advanced Bash Scripting Guide for more information on regular expressions. |
Security
One of the most basic aspects of security on a Linux system, are the permissions you set on your files and directories. These allow you to control who can access your files and who can enter your directories. The set of all users on the system are partitioned into: the owner or user of the file (u), the members of the primary group the user belongs to (g), and all other users (o). For each of these 3 partitions, you can give read (r), write (w) and (x) execute permissions, permitting the corresponding operations. For directories, a user needs execute permission to enter it. For example, to allow users in your group to enter the directory containing your home page, but to prevent all except the owner from modifying, executing or even looking into the files themselves you can do the following (note that + indicates adding a permission, - removing a permission and = setting exactly that permission):
$ cd ~/public_html $ chmod g+x . $ chmod go-wx * |
To print your username, as well as the groups you belong to, type id. To just print the groups, type groups. To just print your username type whoami.
At this point, take a moment to check the permissions on your home directory and on the files
in your home directory. These should be set so that only you can access the home directory.
Check this by typing in the following command, and you should see a response like this (you should see your username in place of xyz12 below):
$ cd $ ls -lad . drwx--s--x 16 xyz12 xyz12 4096 Sep 12 15:05 . |
| If you see different permissions for your home directory, in particular if you see read or write permissions for users other than yourself, you should change the permissions back to the original settings. You can do so with this one-liner:
711 is an octal number that encodes all permissions in one go. The octal value expands
to the binary value 111001001, which in turn a bitmask for the read, write and execute permission
of the user, group and others. Therefore, you read 711 as the permissions rwx--x--x as displayed by the ls -l command.
|
Most Linux distributions extend this scheme of base permissions: named users and named groups can be created. This lifts the restriction of associating only 1 user (owner) and 1 group to a file or folder. For each named user and named group, an own set of permissions can be defined. The command getfacl displays the current set of permissions for a file and the command setfacl modifies these. For more detail see the section on Access Control Lists (ACLs) on these slides (4up version).
One concrete example is the case where you want the web server user apache to be able to write files. You can grant write access on a particular file filename to the apache user like this:
$ setfacl -m u:apache:rwx filename |
$ getfacl . # file: . # owner: xyz12 # group: msc # flags: -s- user:apache:rwx user::rwx group::--x other::--x |
apache, for whom we have set read, write and execute permissions in the command above.
If a file or directory has permissions for named users attached to it, this will show up as a +
in an ls -l listing.
Since some of these commands need special permission, you best try them on your own laptop, referring to the slides above for explanation.
| More on file security: |
|---|---|
For more information on file permissions and ACLs, see Chapter four in Sobell's textbook. |
Your environment
You can customise your Linux environment, by modifying the files .profile and .bashrc in your home directory. The most common customisation is to define an alias as discussed above. Or you can set your prompt, which will replace the $ symbol in your examples.
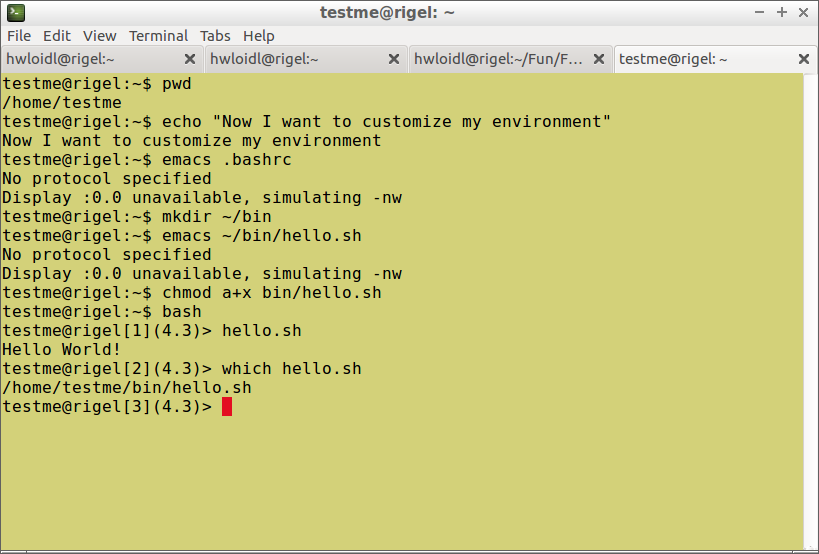
One important example of tuning your environment, is to tune the list of directories that are searched when you type in a command. By default, only system directories are searched. You can check this using the which command:
$ which ls /bin/ls |
$ export PATH=$PATH:~/bin |
$ hello.sh |
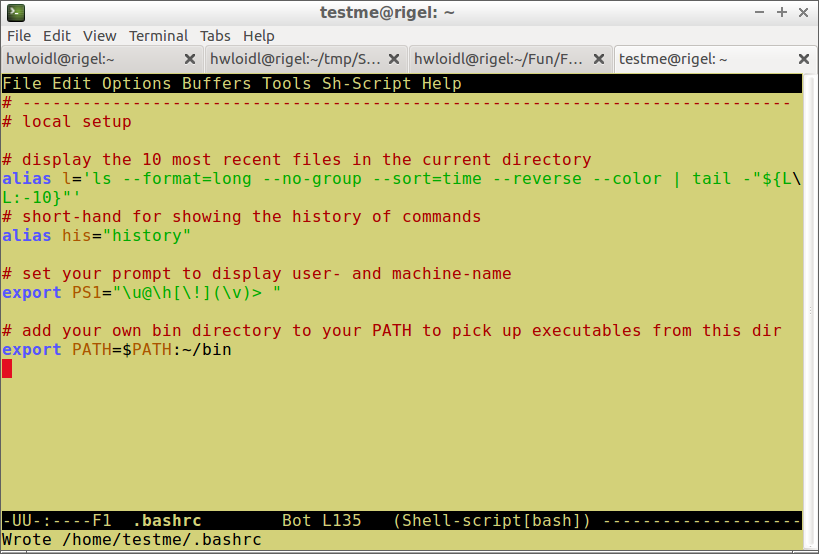
To test that the changes are in effect, start a new shell by typing bash and then execute one of the new commands, such as his, or execute a file in your ~/bin directory, such as hello.sh, like this:
History and command line editing
The shell keeps a history of all executed commands, which you can display by typing history. On the command-line, use UP-ARROW or CTRL-P to show the previous command in the history, and DOWN-ARROW or CTRL-N to show the next command in the history. You can edit the line shown, to execute a slightly modified command. Use CTRL-A to jump to the beginning, and CTRL-E to jump to the end of the line, and use backspace for deleting characters. For filename completion, type the first letters of the file you want to refer to, and then use TAB. All keybindings available on the command line are provided by the readline library (see info readline for more detail: info rluserman).
Other useful commands
Some more useful commands are:
du estimate file space usage
df report free disk space
file determine file type
diff compare files line by line
cmp compare two files byte by byte
dd convert and copy a file
pushd adds a directory to the top of the directory stack, making the new top of the stack the current working directory.
popd removes entries from the directory stack.
dirs displays the list of currently remembered directories.
tar A tar (tape archiver) program.
gzip compress or expand files
bzip2 a block-sorting file compressor
Some Exercises
| Basic Exercises |
|---|---|
Answer the following questions by using and interpreting the appropriate command on the commandline:
|
| Advanced Exercises | ||
|---|---|---|---|
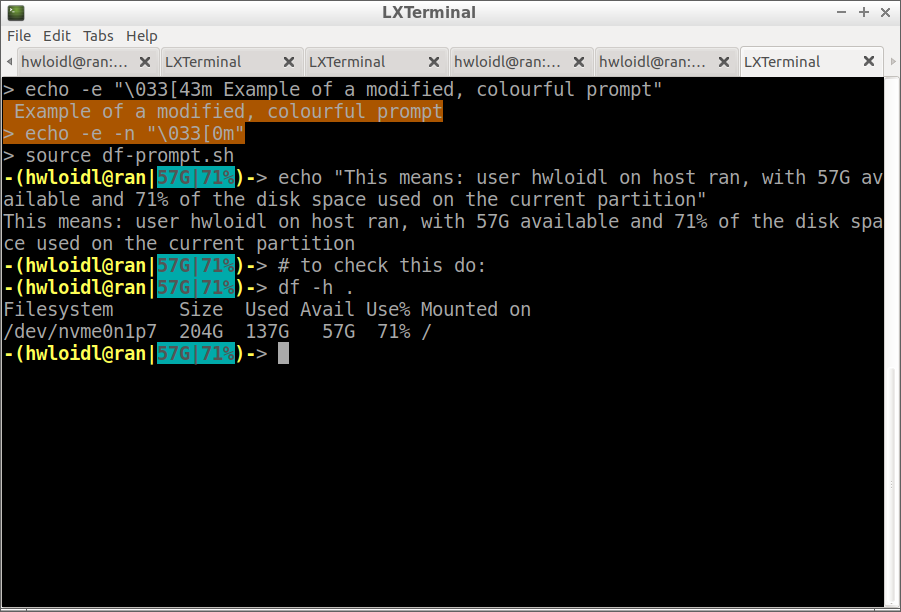
As an advanced exercise, modify your prompt on the command line, so that it shows the user-name, the host-name, as well ass the available disk space and disk utilisation on the current partition. Use colour background to high-light the last 2 pieces of information. Once implemented correctly, you should see a prompt as in the picture below. First, test your solution by directly changing prompt on the command-line using
|